0
Browsing Tag

Pinterest

In Blogging/ Craft

Super Easy Quilt Making.

Super Easy Quilt Making.

‘Super easy quilt making’ is probably the wrong title for this post.

It should actually read, ‘ Make it up as you go ‘.

This morning I was doing my favourite Sunday morning activity. That would be drinking coffee in my p.j’s whilst browsing Pinterest – when I came across this:

Super Easy Quilt Making

(Credit)

I love fabric, I love making things but i’m not very precise with them. My seams don’t line up and my sewing is only straight-ish. So I clicked into the post, read it all (it is a really good read) and decided that I would make a start on a quilt.

At the knit & Stitch show 2015 (yes, it was that long ago) I got some gorgeous Tilda fabric from The Crafty Fox stand.

Super Easy quilt making

Then last year I bought some pale pink velvet to make a backing for said fabric.

quilt5

The tutorial said that she had used fabric of all sizes. Since I had bought fat quarters I thought i’d cut them a little more evenly to get the best layout from them.

The ‘How To’ bit…

First of all I ironed them (being folded for a year and a half really sets those creases!) Then marked them every 4 1/2 inches and drew a pencil line.

Super easy quilt making

I do have a rotary cutter but I just can’t get along with it, so I used scissors.

Super easy quilt making

Once I had cut up all five fat quarters into the 4 1/2″ strips, I cut those strips into random sized pieces. I cut some lengths into two sections and some into four or five. There was some pretty fabric with buttons on it in my stash so I added a little of that as well as a few pieces of the darker green stripe (top left in the picture).

I had bought a full metre of the green stripe so I thought I’d use that for the binding. It’s a bit of a contrast to the main colours but by adding a few little bits into the quilt top it will all blend in. Remember the ‘make it up as you go ‘ theme? yep, that’s where the binding that doesn’t match came from.

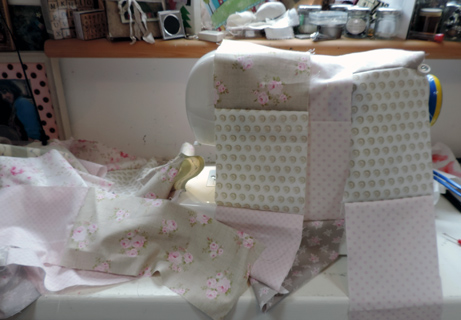
To make the top I just sewed pieces from each pile together in a long strip. There was no pattern to it, just randomly choosing a piece and sewing to the last. It didn’t take very long  – in no time at all I had this:

Super easy quilt making

That’s a long strip of fabric!

Five fat quarters cut into 4 1/2 inch strips (with a little of the two other fabrics thrown in) came to an amazing 40 foot long strip!

Next I decided how wide I wanted my quilt to be (you can see how well I thought this out before I started can’t you?) which was 36 inches. By the time I had cut up the whole thing I had thirteen strips. The last one was slightly short so I just added an extra piece of button fabric.

Super easy quilt making

You can see how the order you sew them together in doesn’t really matter. The different sized blocks make it less precise and you can move the strips around until you like the layout. Of course, then it all has to sewn together, but that is really easy especially if you’re not too precious about sewing straight.  I do try, I line up my edges and keep the sewing machine foot on the edge but the straight line just alludes me. Real quilters are amazing, they make it look so easy!

Super easy quilt making

(I should have ironed this before I took the photo……)

It took two and a half hours to go from Pinterest to having the quilt top sewn together, much faster then piecing squares! I have to get wadding tomorrow (if you live in a place where there is a fabric shop nearby that is open seven days a week then you are a very lucky person!) and then decide how to quilt the layers together. I would love to try some free motion quilting but i’m not brave enough yet.

Tune in next week to see if I’ve made any progress…… hopefully I will have a finished quilt to show off!

Felicia xx


In Craft

Knit one, Purl one.

Knit one, Purl one..

Do you knit? Do you like cosy fires and winter days and knitting away the winter?

In theory so do I, but for some reason whenever I get bitten by the knitting bug its summer time.

You could argue the summer part, officially its Autumn, but the days are still fairly warm (20°C today).

Also, this knitting bug only bites once in a blue moon. To call myself a knitter is stretching the truth a little.

The last time it struck was four years ago, I was knitting a shawl in a beautiful Debbie Bliss wool. Cashmerino Aran in Blackberry to be exact.

Now, as you may or may not know, my knitting was seriously hampered by this.  It has taken a while to get back to it, I did make a rabbit for a friend, but as it happens I had knitted all the pieces before T.F.D. (That fateful day) so all I had to do was stuff it and sew the legs on.

But then,

I was scrolling through Pinterest as I do (the most enjoyable time waster ever!) and came across this:

Knit one, purl one

(You can get it here)

And then I remembered my promise. About nine years ago Tim asked me to knit him an Aran jumper. He rarely asks for anything, and so I said, “Of course, you can have it for Christmas”.  I promptly got the most amazing pattern and spent about  a week knitting, then unpicking the stitches. That very complicated  pattern was made for a better knitter than I!

Eventually I gave up  and told him, “Next Christmas for sure”, which turned into, “You’ll have it before you retire”.

Well, the fifth anniversary of his retirement has just passed. Yes, I am a terrible person.

I even contemplated buying a jumper and cutting out the labels but my conscience got the better of that plan.

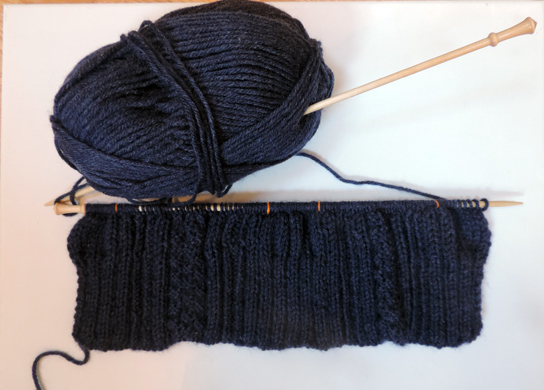
Although this doesn’t have any cable stitches its fairly close to what he wants, so I bought it, got the wool and here it is!

TA DAH!

Knit one purl one

You thought it was going to be finished didn’t you?

There are precisely five inches on the needles, but look at the pattern, isn’t it fab?! Because of the pattern changes it’s holding my interest, who knows, I might even finish it in time for Christmas!

Felicia xx

In Felicia the Artist

Its Beginning to Look a lot Like……

Its beginning to look a lot like…… dare I say it? No!

It is the last day of November, we have all been bombarded with those adverts since the day after Halloween, but its not really the season until I hear ‘All I want for C——-s is you’ on the radio.

 ( * a quick disclaimer* I am not a Mariah Carey fan at all but there is something about the introduction to that song that makes my insides fizz – instant festiveness!)

However, tomorrow is the first day of December and so the ‘DECEMBER DAILY’ begins and I am just a little bit excited!!!

If you don’t know about the December Daily then have a look at Youtube or Pinterest, you’ll find loads of examples there. It is basically an album to document the month (or up until the 25th) you take a photo every day and write something about it and at the end you have a journal of your lead up to that thing that we can’t mention yet.
I made one in 2013 but last year I didn’t get around to it , which now makes me quite sad as they are so lovely to look back through. This year I am actually quite organised (I know, not like me at all!)
I have made a monster of an album, the spine is 3 inches wide and it has taken ages! I used ‘North Pole’ papers by Trimcraft – they are a little unusual, all red and blue, no green but I loved them for the airmail stripe paper!

 You can never have enough space in these things so I have paper bag pages attached to the main pages.

Look at that Airmail stripe, I love it! – it reminds me of the letters my Dad would send home from the Gulf when I was small.

The spine so far…. I’m pretty sure more stuff will get added before the month is out.

 My friend Sally gave me this box recently and it was perfect for keeping all my bits ready for embellishing – its amazing what you can find in your stash! The numbers are from a ‘Simple Stories’ collection pack, I covered them with glossy accents to give a little shine. The small banner style numbers (in the bottom left corner) came from a free printable on Pinterest, I just glittered them up a bit – you can find it here.

 The front of the album is plain enough – I keep them on the book shelf so the front and back covers can’t have any bulky embellishments.

I’m going to the Create with Kate party on the 12th (all details in the link, I have free seats in the car if anyone wants to go!) I never get any work done at these things,too busy chatting and catching up, but just in case i’ll bring it along.

I’m all set now – all I have to do is remember to take the photos!

In Felicia the Artist

The Best Season of All.

Well, its here again, the season of new boots, the season of cosy, my favourite season of all – Autumn!
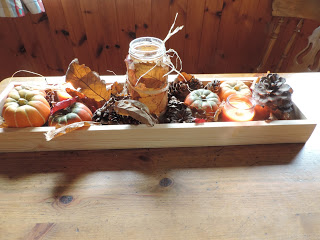
On the first of the month I started with subtle decorations, even I thought it was a little early for pumpkin carving, so thanks to a little Pinterest inspiration (who am i kidding, it was hours of deliciously lost time finding all sorts of Autumnal goodness) I started to gather some leaves and cones on my walks and put this together.

Inspiration

The jar in the centre is covered with leaves and wrapped in raffia. I used Mod Podge to glue them on but the leaves had to be held in place while they dried, so the next one I made I used a hot glue gun and that was much quicker. It has a battery operated tea light inside which creates a lovely glow along with the small Pumpkin spice candles.
I found the little clay pumpkins at Mr Price, they were really cheap so there are six or seven in the tray, the tray itself was made by Himself. The conversation went something like this:

Me: Do you have any wooden trays lying about in your workshop?
Tim: What kind of wooden tray?
Me: Oh you know, one about 24″ by 6″ by 2″….
Tim: Hmmmmm…………
(imagine measuring, the sound of sawing and nailing)
And then I came home and found this.

Thank you Tim!!!! xxx

The Virginia Creeper that grows across the back wall of our garden is a great barometer of the seasons.The leaves turn the most beautiful red colour and then start to fall, but with a chiminea and candle lamps the garden is still a lovely place to be. That clay pot with the spiders web on is a lamp, we have electric sockets on the deck so it plugs in and looks so pretty – if I was any good I would insert a photo of it lit here, but its raining at the moment, so I’m not going out to take a photo!

Along with decorations I have made a few Halloween Trick or Treat bags for a swap organised by Aideen . They went in the post today, so as soon as my swap partner gets them I shall put up some piccys.

Have a lovely week xxx

In Felicia the Artist

The Messy Desk Award goes to……

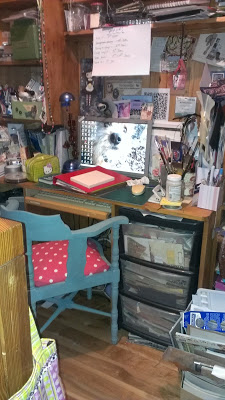
Some of you have seen this mess craft space before… if you search a way back on this blog you will see a quick video of when it was first built (if I was any good i’d link it for you, but i’m not…) and I must tell you that I love this space! before this I worked on the kitchen table and we all know what thats like.
So, this desk and these shelves were built on the landing which was the only unused space in the whole house. They have served me very well, but as you can see things have gotten a little out of hand!

 As bad as it looks, I do know where everything is – if you needed some alpha stickers you go to the pink box on the bottom shelf on the right, or double sided tape? thats on the middle shelf above the desk. Anyhoo, Himself decided enough was enough and the only way to create a craft room was to build on a tiny extension. Wasn’t that nice of him? ( he wants this desk for his own “stuff”, but still its nice of him!)

 Last October the foundation was layed, its tiny as I said, about 10x8ft, but it’ll be MINE!! today as I write this there are workmen in the garden putting up soffits and wotnot (i’m sure what soffits do, but we need them apparently) We did almost all the work ourselves, foundation, frame, walls, insulation, panelling, wiring – we only got tradesmen for the roof and the bit they are doing today and a plasterer for inside.

I will put up all the “step-by-step” photos soon, but its not ready yet. On Friday we will lay the floor, the walls are painted (white walls and ceiling, wooden floor) and then the great move begins!! I am scouring the Ikea catalogue trying to decide what I need – drawers or shelves? lots of baskets is the only decision so far, and an arm chair for Tim to sit in when I invite him in for a visit (He fears he will never see me again once its livable!)

My inspiration so far is this photo from Pinterest, it was put up by this lady, I think i’ll have to stalk her blog to see what other ideas she has!

If anyone has any storage tips please pass them on, i’m off back to my measuring tape and Ikea catalogue!!
Bye!!! xx
p.s. There is one kit left for Saturday in Waterford if you’d like it?